


A proper legal analysis is necessary based on your location and contract. Consult an attorney in your home state for advice regarding your contract or specific legal situation.


Brand new contract in hand, you’re feeling empowered and confident in protecting your business. But how do you actually send that contract to your clients? What's the best way and most secure way for them to sign? The truth is, it depends! There are lots of options out there such as online client management systems, programs such as docusign, and the good old fashioned way, paper. In this post, I’m sharing how to upload your template contract into the most popular CRMs among TLP contract purchasers: HoneyBook! That way, you’ll know exactly how to send your contract to the next client that pops in your inbox.
By far the most popular way most small business owners manage and send their contracts are through systems called client management systems or CRMs. These programs, such as Dubsado, HoneyBook, 17 Hats, Sprout Studio, Tave, Aisle Planner, Studio Ninja, Pixifi, etc., allow you to securely send your contracts to clients for them to sign electronically and help you keep multiple client contracts in one place.
To add a contract template in HoneyBook, first go to the top menu bar and select “Tools”. In the dropdown menu, you will then select “Templates”.

On the new Templates page that opens, go to the left hand side and select “Contracts”. Then click on the “Create a New Contract” button box.

A new contract template will open up. You will see your main header image at the top and then a place to input text underneath the formatting options. Copy and paste your TLP template contract into the body of the contract template.

Don’t forget that you can click on “Customize Field” in the top formatting bar and insert fields within your template contract that will change from client to client such as names, addresses, locations, hours, rates, etc.

Once you have your contract template all ready to go, make sure to title the template as something you will remember when sending to clients!
When you’re ready to send the contract to a new client, first make a “Project” for the client in the top navigation bar. Then, go into that client’s project and select “New File” (top right square button) and then “Contract” underneath.
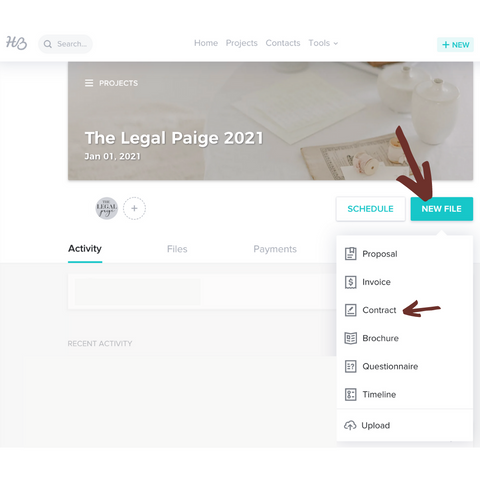
A pop-up box will appear that allows you to either create a new blank contract or select a contract template that you’ve inputted already into your Honeybook. You will select the contract template you named above.

Once the new contract for that specific client appears, enter the full text of your contract in the text box below the header. Then edit the contract template as it pertains to your specific client and be sure to fill out the necessary fields. *Make sure to add electronic signature lines at the bottom of your contract for each client and yourself as the company servicing them!
Voila! You’re ready to send your new contract via HoneyBook!
When it comes to sending contracts to your clients you absolutely have options. Sending via HoneyBook is easy and secure way to make sure your contracts are getting to your clients. Take time to explore programs with a free trial, test it out and see if you like this platform as much as I do!


THIS BLOG POST IS NOT A SUBSTITUTE FOR LEGAL ADVICE. EVERY SITUATION IS DIFFERENT & IS FACT-SPECIFIC. A proper legal analysis is necessary based on your location and contract. Consult an attorney in your home state for advice regarding your contract or specific legal situation.
A proper legal analysis is necessary based on your location and contract. Consult an attorney in your home state for advice regarding your contract or specific legal situation.


